 By default, all users can create Microsoft 365 groups. This is the recommended approach to allow users to collaborate without needing assistance from IT. However, some companies require more strict permissions around who can create groups. You can restrict Microsoft 365 Group creation to members of a particular security group. Limiting this permission affects all services that rely on groups for access, including:
- Outlook
- SharepointYammer
- Microsoft Teams
- Microsoft Stream
- Planner PowerBI
- Project for the web / Roadmap
To configure this, you must first have access to Windows Powershell. In this article, we will walk you through the needed steps.
Note:
the following steps do not prevent members of roles like the Office 365 Global admins from creating groups. Other roles can also create Groups via limited means, seen below.
- Exchange Administrator: Exchange Admin center, Azure AD
- Partner Tier 1 Support: Microsoft 365 Admin center, Exchange Admin center, Azure AD
- Partner Tier 2 Support: Microsoft 365 Admin center, Exchange Admin center, Azure AD
- Directory Writers: Azure AD
- SharePoint Administrator: SharePoint Admin center, Azure AD
- Teams Service Administrator: Teams Admin center, Azure AD
- User Management Administrator: Microsoft 365 Admin center, Yammer, Azure AD
To manage who can create groups, the following people need AD Premium licenses or Azure AD Basic EDU licenses assigned to them:
- The admin who configures these group creation settings
- The members of the security group who are allowed to create groups
The following people don't need Azure AD Premium or Azure AD Basic EDU licenses assigned to them:
- People who are members of Microsoft 365 groups and who don't have the ability to create other groups.
The steps we will cover in this article are:
Step 1: Create a security group for users who are permitted to create Microsoft 365 groups
Step 2: Run PowerShell commands
Step 3: Verify that it works
Step 1: Create a security group for users who need to create Microsoft 365 groups.
Only one security group can control who has the permissions to create groups. But, you can create nested groups within this parent group. IMPORTANT. Be sure to use a security group to restrict who can create groups. Using a Microsoft 365 group is not supported.
- In the admin center, go to the Groups page.
- Click on Add a Group.
- Choose Security as a group type. Remember the name of the group! You'll need it later.
- Finish setting up the security group, adding people or other security groups who you want to create groups in your org.
Step 2: Run PowerShell commands.
Open the preview version of Azure Active Directory PowerShell for Graph (AzureAD), module name AzureADPreview. To change the group-level guest access setting:
- If you haven't installed any version of the Azure AD PowerShell module before, see Installing the Azure AD Module and follow the instructions to install the public preview release.
- If you have the 2.0 general availability version of the Azure AD PowerShell module (AzureAD) installed, you must uninstall it by running Uninstall-Module AzureAD in your PowerShell session, and then install the preview version by running Install-Module AzureADPreview.
- If you have already installed the preview version, run Install-Module AzureADPreview to make sure it's the latest version of this module.
Copy the script below into a text editor, replace <SecurityGroupName> with the name of the security group that you created in step 1. For example:
$GroupName = "Group Creators"
Save the file as GroupCreators.ps.1 In the PowerShell window, navigate to the location where you saved the file (type “CD”). Run the script by typing
.\GroupCreators.ps1
and sign in with your administrator account when prompted.
$GroupName = "<SecurityGroupName>"
$AllowGroupCreation = $False
Connect-AzureAD
$settingsObjectID = (Get-AzureADDirectorySetting | Where-object -Property Displayname -Value "Group.Unified" -EQ).id if(!$settingsObjectID)
{
$template = Get-AzureADDirectorySettingTemplate | Where-object {$_.displayname -eq "group.unified"} $settingsCopy = $template.CreateDirectorySetting() New-AzureADDirectorySetting -DirectorySetting $settingsCopy $settingsObjectID = (Get-AzureADDirectorySetting | Where-object -Property Displayname -Value "Group.Unified" -EQ).id
}
$settingsCopy = Get-AzureADDirectorySetting -Id $settingsObjectID $settingsCopy["EnableGroupCreation"] = $AllowGroupCreation
if($GroupName) { $settingsCopy["GroupCreationAllowedGroupId"] = (Get-AzureADGroup -SearchString $GroupName).objectid } else { $settingsCopy["GroupCreationAllowedGroupId"] = $GroupName } Set-AzureADDirectorySetting -Id $settingsObjectID -DirectorySetting $settingsCopy
(Get-AzureADDirectorySetting -Id $settingsObjectID).Values
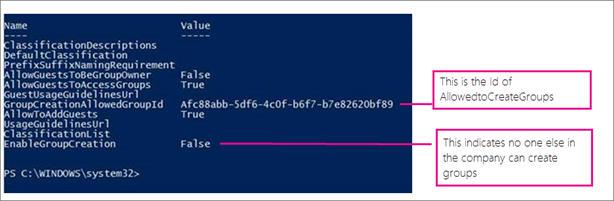
The last line of the script will display the updated settings:
If in the future you want to change which security group is used, you can rerun the script with the name of the new security group.
If you want to turn off the group creation restriction, set $GroupName to “” and $AllowGroupCreation to “True” and rerun the script.
Step 3: Verify that it works.
Changes can take thirty minutes or more to take effect. You can verify the new settings by doing the following:
- Sign in to Microsoft 365 with a user account of someone who should NOT have the ability to create groups. That is, they are not a member of the security group you created or an administrator.
- Select the Planner tile.
- In Planner, select New Plan in the left navigation to create a plan.
- You should get a message that plan and group creation is disabled.
Try the same procedure again with a member of the security group.
And then you have successfully set up a system that only allows specified members from creating Microsoft 365.
For more information, see the official Microsoft documentation on this feature here.